Changelog
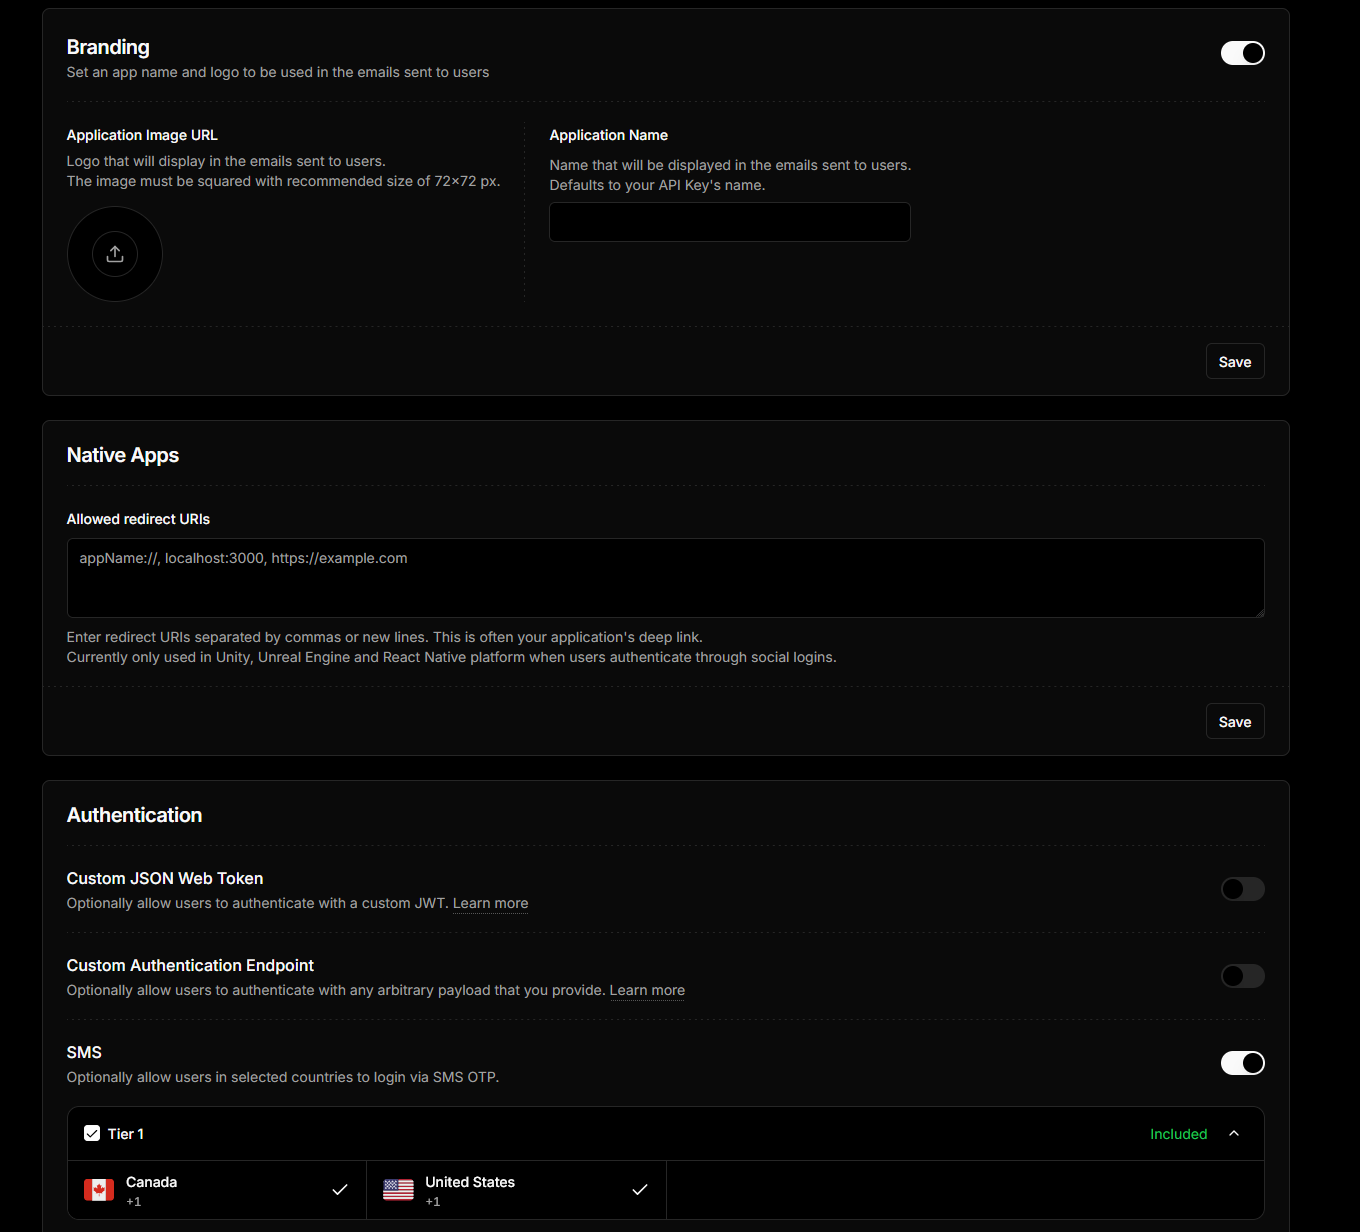
Ecosystem customers can now add custom partner logos to email OTP authentication flows, giving each partner in your ecosystem their own branded experience.

When users authenticate via email OTP through your ecosystem wallet, they can now see your partner's logo instead of your ecosystem's default branding. This enables true white-label experiences for each partner operating within your ecosystem.
Partner Logo Upload: In the thirdweb dashboard, ecosystem owners can now upload custom logos for each partner. Navigate to your partner settings and add a logo URL in the new "Partner Logo" field.
Smart Fallback: The branding hierarchy automatically prioritizes the most specific branding:
- Partner logo (if configured for that partner)
- Ecosystem logo (your default branding)
The thirdweb SDK now supports x402 protocol version 2, introducing header-based payment flows for improved efficiency and flexibility in blockchain payment integrations.
- New Payment Headers: v2 uses
PAYMENT-SIGNATUREfor requests andPAYMENT-RESPONSEfor responses, replacing the v1 headers (X-PAYMENTandX-PAYMENT-RESPONSE) - Streamlined Responses: Payment requirements are now encoded in the
PAYMENT-REQUIREDheader rather than the response body, reducing payload size - Backward Compatibility: The SDK maintains full backward compatibility with v1, automatically detecting and handling both protocol versions
Payment data retrieval now prioritizes v2 headers with fallback to v1:
This change applies to:
settlePayment()- Server-side payment settlementverifyPayment()- Payment verification- Middleware implementations
New optional x402Version parameter allows explicit version control:
No breaking changes - existing v1 integrations continue to work unchanged. To adopt v2:
- Update header reading to check both headers (as shown above)
- Optionally specify
x402Version: 2in configuration - The SDK handles version negotiation automatically
For complete implementation details and examples, see the documentation.
The Solana Token Deployment endpoint enables you to create new fungible tokens on Solana with a single API call. It supports both the standard SPL Token program and the newer Token-2022 program with advanced features.
Endpoint: POST /v1/solana/deploy
Base URL: https://api.thirdweb.com
This endpoint requires server-side authentication using your secret key. Never expose your secret key in client-side code.
x-secret-key: YOUR_SECRET_KEY
| Parameter | Type | Required | Description |
|---|---|---|---|
from | string | ✅ | Solana wallet address that pays for deployment |
chainId | string | ✅ | Network identifier: solana:mainnet or solana:devnet |
name | string | ✅ | Token name (1-32 characters) |
symbol | string | ✅ | Token symbol (1-10 characters) |
decimals | number | ❌ | Decimal places (0-9, default: 9) |
initialSupply | string | ❌ | Amount to mint in base units |
mintAuthority | string | ❌ | Address allowed to mint (defaults to from) |
freezeAuthority | string | ❌ | Address allowed to freeze accounts |
tokenProgram | string | ❌ | spl-token (default) or token-2022 |
| Field | Description |
|---|---|
transactionId | The Solana transaction signature |
mintAddress | The address of your new token mint |
Mint 1,000,000 tokens at deployment (with 9 decimals):
Note: initialSupply is in base units. For 9 decimals, multiply your desired amount by 10^9.The standard Solana token program. Recommended for most use cases.
- ✅ Widely supported by wallets and DEXs
- ✅ Lower transaction fees
- ✅ Maximum compatibility
The newer Token Extensions program with advanced features.
- ✅ Transfer fees
- ✅ Interest-bearing tokens
- ✅ Confidential transfers
- ✅ Non-transferable tokens
- ⚠️ Not all wallets/DEXs support Token-2022 yet
| Use Case | Recommended Decimals |
|---|---|
| SOL-like tokens | 9 |
| Stablecoins (USDC-like) | 6 |
| NFT-adjacent tokens | 0 |
| High-precision DeFi | 9 |
| Status | Description |
|---|---|
400 | Invalid request parameters |
401 | Missing or invalid authentication |
500 | Server error during deployment |
504 | Transaction confirmation timeout |
- Test on Devnet first — Always deploy to
solana:devnetbefore mainnet - Secure your secret key — Use environment variables, never commit to code
- Verify the mint address — Check the returned
mintAddresson a Solana explorer - Plan your authorities — Consider who should control minting and freezing
- Calculate supply correctly — Remember to account for decimals in
initialSupply
- Thirdweb API Reference — Official thirdweb API reference
- Solana Explorer — View your deployed tokens
- SPL Token Documentation — Official token program docs
- Token-2022 Documentation — Token Extensions guide
The Bridge widget iframe makes it easy to embed cross-chain swaps and fiat onramp UI into your app. Just add an iframe to your HTML and get a fully customizable widget - no client id required!
- Cross-chain token swaps across 85+ blockchains
- Fiat onramp support to buy tokens with credit/debit cards
- dark and light mode support
- Set custom default token selections using query parameters
- Display fiat values in multiple currencies
Today, we are launching Dedicated Relayers—fully managed, private transaction infrastructure designed to give your application the dedicated resources it needs to scale.
When you use a shared relayer, your transactions are processed alongside thousands of other applications using thirdweb. While this works for many use cases, high-scale applications need more control and reliability.
With a Dedicated Relayer, you get:
- Guaranteed Throughput: Your transaction queue is yours alone. No rate limits caused by other users and no "noisy neighbor" problems.
- Parallel Execution: Scale your transaction capacity by adding multiple executor wallets. Our Premium tier offers 10 executor wallets, allowing you to submit transactions in parallel for up to 10x higher throughput.
- Multi-Chain Support: seamless operation across multiple chains. Configure your fleet to handle traffic on the networks that matter to you.
- Dedicated Analytics: A brand new dashboard view to track your fleet's performance, including total gas spent, transaction success rates, and active chain metrics. The best part - you can build your own dashboards easily now, unlike with shared 4337 and 7702 infra, by simply collecting transactions initiating from your dedicated executor addresses.
We’ve designed flexible tiers to match your growth stage:
- Standard ($99/mo): Ideal for startups and apps with moderate volume. Includes support for 1 chain and a single executor wallet.
- Premium ($299/mo): Built for enterprise-grade scale. Includes support for up to 2 chains and 10 executor wallets for maximum parallel throughput.
- Custom: For applications operating at massive scale, we offer custom configurations with unlimited chains and executors.
Dedicated Relayers are available today in the dashboard. Navigate to Wallets > Dedicated Relayer in your project settings to deploy your fleet and start scaling your
We shipped a change in our x402 stack that allows settling multiple payments with the same payment authorization, up to a maximum amount. This opens up a lot more x402 use cases like AI chat sessions, automations, scheduled actions and more!
This is possible using the new upto scheme, which authorizes a maximum amount to be withdrawn. Users can authorize $1 once, then spend 100 times $0.01 without having to resign anything.
Very useful for AI apps. Authorize once for the whole chat session, but still settle micro payments on every message.
To make this work, use the upto scheme on the backend when verifying and settling payments with an optional minimum price. On the client, wrapFetchWithPayment and useFetchWithPayment will automatically cache and re-use the payment authorization while its still valid, no extra state needed.
Learn more in our developer documentation.
Happy building! 🛠️
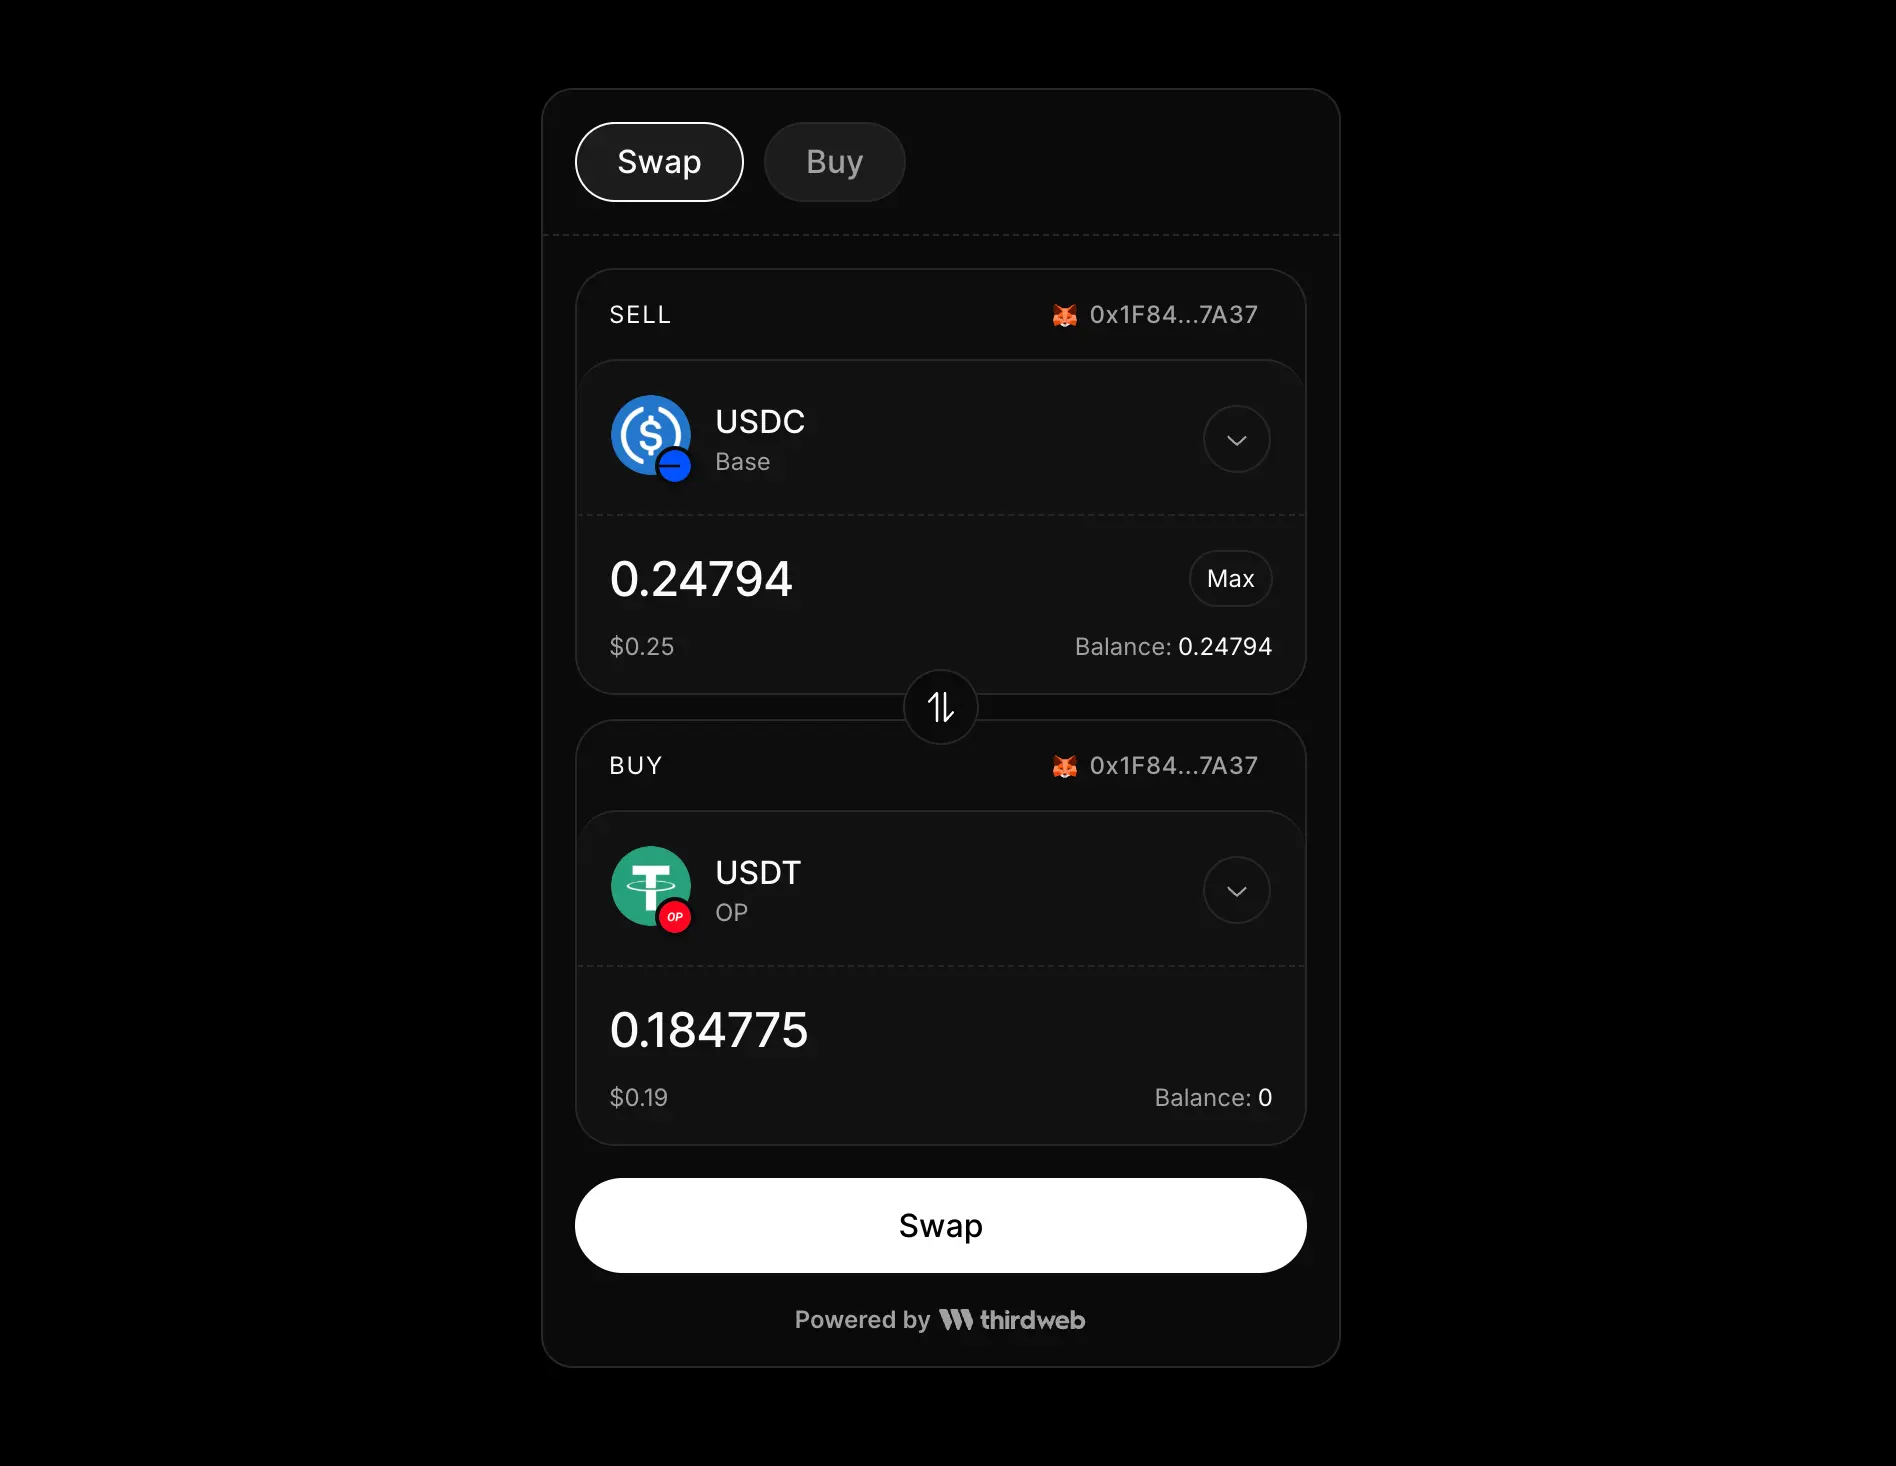
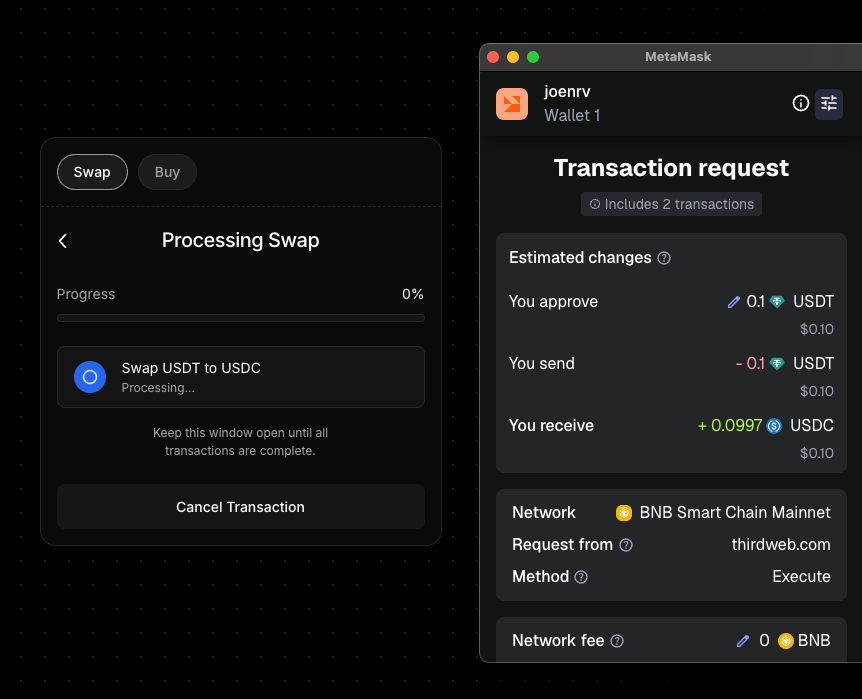
You can now swap tokens held by your server wallets directly from the dashboard. Useful to convert the fees and payments you receive to the token / chain of your choice.
Simply head to your project dashboard, you'll find a new "Swap" button in your project wallet card. You'll need your project secret key to perform transactions with your wallet. Once entered, simply follow the steps in the swap UI to convert the held token to another one on the same chain or a different chain.
Happy building! 🛠️
We recently shipped 3 important improvements to the Bridge API and widgets.
We reduced the number of confirmations required by half for erc20 token swaps in the Bridge widgets. Under the hood we leverage ERC-5792 enabled wallets to atomically perform approvals and swaps in one transaction.
We dramatically improved the performance of our token fetching API, with up to 4x faster load times, especially for wallets with lots of tokens. This improvement is live on thirdweb.com/bridge, dashboard, playground and on v5.115.1 of the SDK.
We also enabled configuring the slippage in the http API and typescript SDK. You can now set a % slippage when requesting a quote, useful for tokens with low liquidity. We continue to set the best automatic slippage by default if not set.
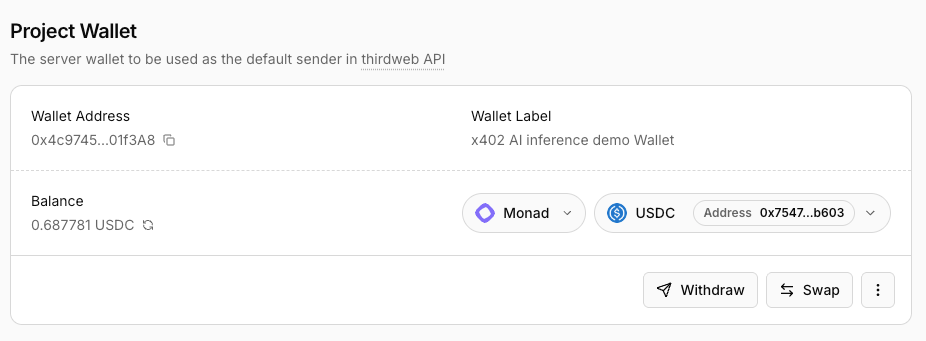
We just improved the Project Server Wallet management from the dashboard to easily view and withdraw funds for any token on any chain.
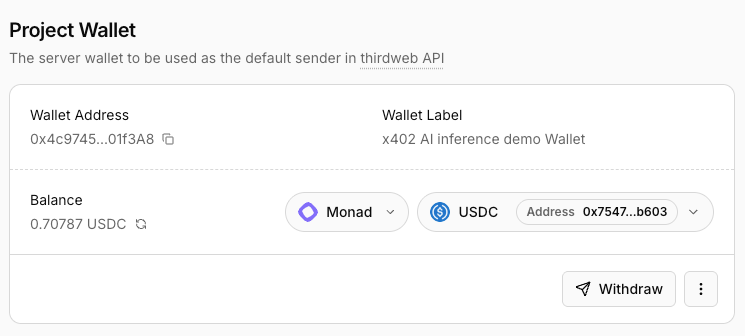
Every thirdweb project comes with a non custodial server wallet by default, you can use this for receiving fees, facilitating x402 transactions or any backend transaction. With this change, you can now quickly glance your balance for any token, and withdraw with one click.
Happy building!
We've updated our x402 client/server stack to enable dynamic payments, perfect for AI APIs that need to charge on a per-token basis.
You can now pass a scheme property to verifyPayment() and settlePayment() which lets you control the payment scheme:
exact(default) - The client pays the exact amount specified in the payment requirements.upto(new) - The client pays any amount up to the specified maximum amount.
This new payment scheme is ideal for AI inference APIs where costs are dynamic based on the number of tokens used in each request.
This can be generalized to any type of API that uses variable amount of units of work, like RPC node APIs for example.
On the client side, the upto scheme is supported in v5.114.0 and above.
We recently open sourced a fully functional AI application that charges per tokens used, check out the repository on Github.
To learn more about how to set this up in your own projects, check out the documentation.
We are excited to announce full support for EIP-7702 Session Keys in the Wallets API. This feature allows you to create secure, scoped permissions for your backend to execute transactions on behalf of your users—without ever taking custody of their main keys.
This is perfect for:
- AI Agents: Allow an agent to trade or interact with contracts within strict limits.
- Automated DeFi: Execute recurring payments or rebalancing without user confirmation for every step.
- Gaming: Perform background actions (like crafting or harvesting) while the user is offline.
- Create a Session Key: Your server generates a new "Server Wallet". This wallet will act as the authorized signer grantee.
- Grant Permissions: The user (client-side) signs a transaction authorizing this Session Key. You can restrict it to specific contracts, functions, or spending limits.
- Execute: Your server uses the Session Key to sign and send transactions. The blockchain treats these transactions as if they came from the user's main account.
Here is a complete, reproducible example using fetch. We will simulate a full flow: creating a guest user, generating a session key, granting permissions, and executing a transaction.
- Secret Key: For server-side calls (backend).
- Client ID: For client-side calls (frontend/simulation).
First, we simulate a user logging in. We'll use the "guest" auth method to instantly generate a wallet and get an authentication token.
Your backend creates a fresh wallet that will act as the session key.
The user approves the session key using their auth token.
Finally, your server executes a transaction. The server uses the Session Key to sign, but the transaction is executed on the User's account.
With just three API calls, you've set up a secure, non-custodial automation flow. The user retains full control and can revoke the session key at any time, while your server gets the convenience of programmatic execution.
Visit our API reference here.
We just shipped the new useFetchWithPayment() React hook in thirdweb v5.113.0, making it easier than ever to integrate x402 payment flows into your React applications with built-in UI for wallet connection, funding, and payment error handling.
The useFetchWithPayment() hook provides a complete payment experience out of the box:
- Automatic Payment Handling - Detects 402 responses and creates payment authorization headers automatically
- Wallet Connection Flow - Prompts users to connect their wallet with a beautiful modal when needed
- Wallet Funding Integration - Shows a BuyWidget to help users top up their wallet when they have insufficient funds
- Error Handling UI - Displays modals with retry options when payments fail
- Response Parsing - Automatically parses responses as JSON by default (configurable)
- Fully Customizable - Customize themes, wallet options, funding widget, and more
- React Query Integration - Built on `@tanstack/react-query` for state management
The hook is available for both web and React Native:
- Web: Full UI support with modals for connection, funding, and errors
- React Native: Core functionality without modal UI (coming soon)
- Documentation: x402 Client Documentation
- Playground: Try it live
- TypeScript Reference: API Reference
Install the thirdweb SDK if you haven't already:
npm install thirdwebThen import and use the hook in your React components as shown above.
Happy Building! 🛠️
We just introduced the ability to set your own developer fees for all x402 transactions. This unlocks new monetization streams for platforms building with of x402 payments.
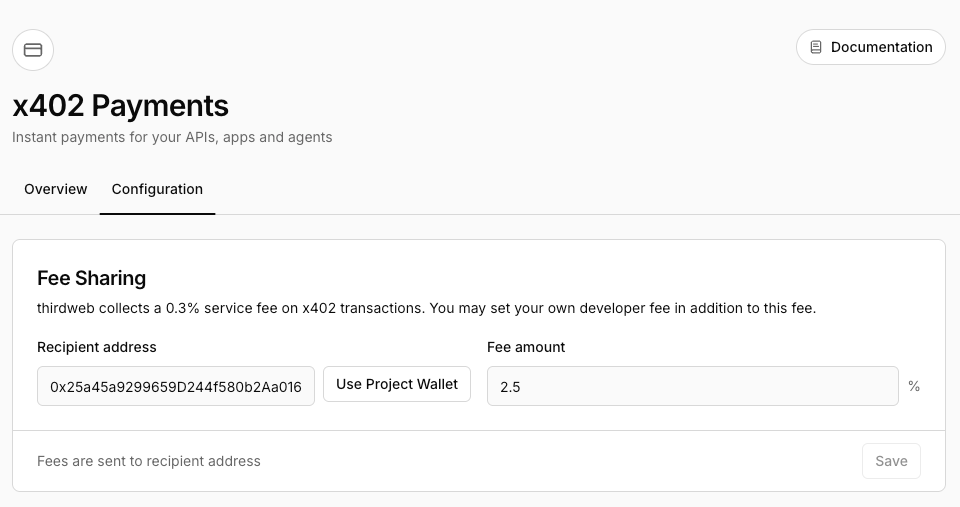
If you're building an platform that lets your users pay other users using x402, you can set your own fee to monetize your platform.
Behind the scenes, whenever your server wallet facilitates a x402 transaction, your portion of the fee will be deducted and sent to the wallet of your choice, all in one atomic transaction.
Simply set up your fee amount and recipient address in your project dashboard under the new x402 section to get started.
We just added comprehensive analytics for your x402 enabled APIs, so you can see payments and volume by resource, buyer and chain.
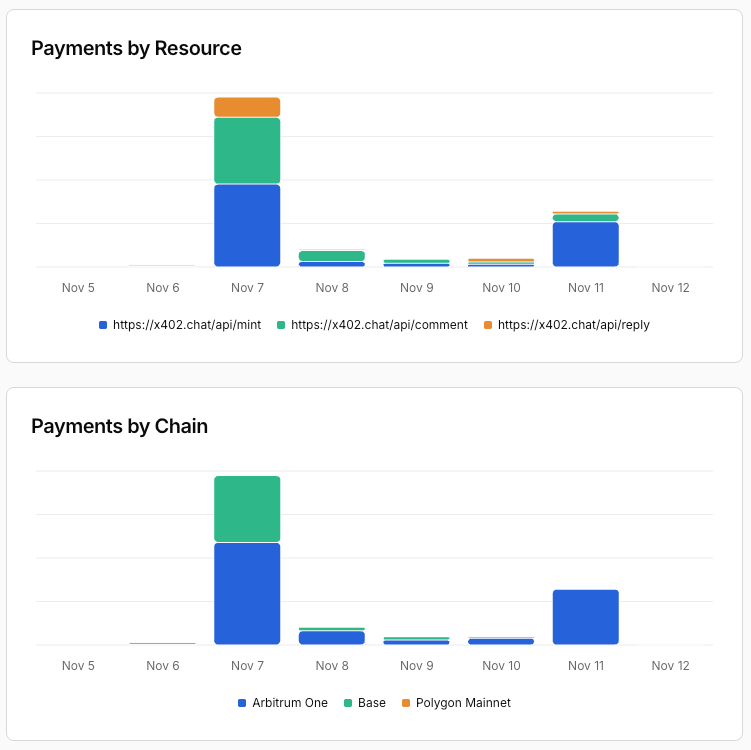
Navigate to the new x402 section of your project to see it in action, or learn how to get started monetizing your applications with x402.
Happy building! 🛠️
Solana just joined the list of supported networks for x402 payments. That means you can now gate, verify, and settle Solana transactions through your own facilitator wallets — fully end-to-end.
This release adds everything you need to spin up your own server wallet, prepare payment payloads, and handle verification + settlement directly on Solana (devnet or mainnet). No middle layers. No bloat.
- Solana facilitator flow — create or register a Solana server wallet, quote pricing with
/v1/payments/x402/accepts, and settle signed transactions with/v1/payments/x402/settle. - Unified verify path —
/v1/payments/x402/verifynow validates Solana payloads the same way it does for EVM, so you can reuse your middleware checks across chains. - End-to-end examples — refreshed snippets for Node environments that show the exact headers, payloads, and success envelopes you should expect in production.
Create a facilitator wallet
The returned address is the server-side payer for settles, so double-check that it appears in your project’s server wallet list.
Fund the wallet: Top up SOL for fees on the target cluster (devnet or mainnet-beta).
Settle on-chain with your facilitator wallet
Use waitUntil: "confirmed" if you need finality before responding to the client.
Verify before you settle
A truthy isValid means the signatures, blockhash, and amounts all check out.
Let payers fetch protected resources. If the client hits the protected endpoint first, have it replay the request through /v1/payments/x402/fetch. The api will answer with the payload you need for verification and settlement.
Quote access with /v1/payments/x402/accepts
Keep paymentRequirements around—clients will sign against it, and the facilitator will reuse it when settling.
Watch your server wallet dashboard or any Solana explorer for the transaction signature the settle endpoint returns.
We've made some major UI changes and grouped the core wallet and transaction functionality into a single Wallets sidebar section in your Project view, with easier access to related functionality for each, let's dive in.
The first section is for your user wallets, previously in-app wallets, attached to authenticated users on your frontend. It contains general analytics as well as a searchable list of users.
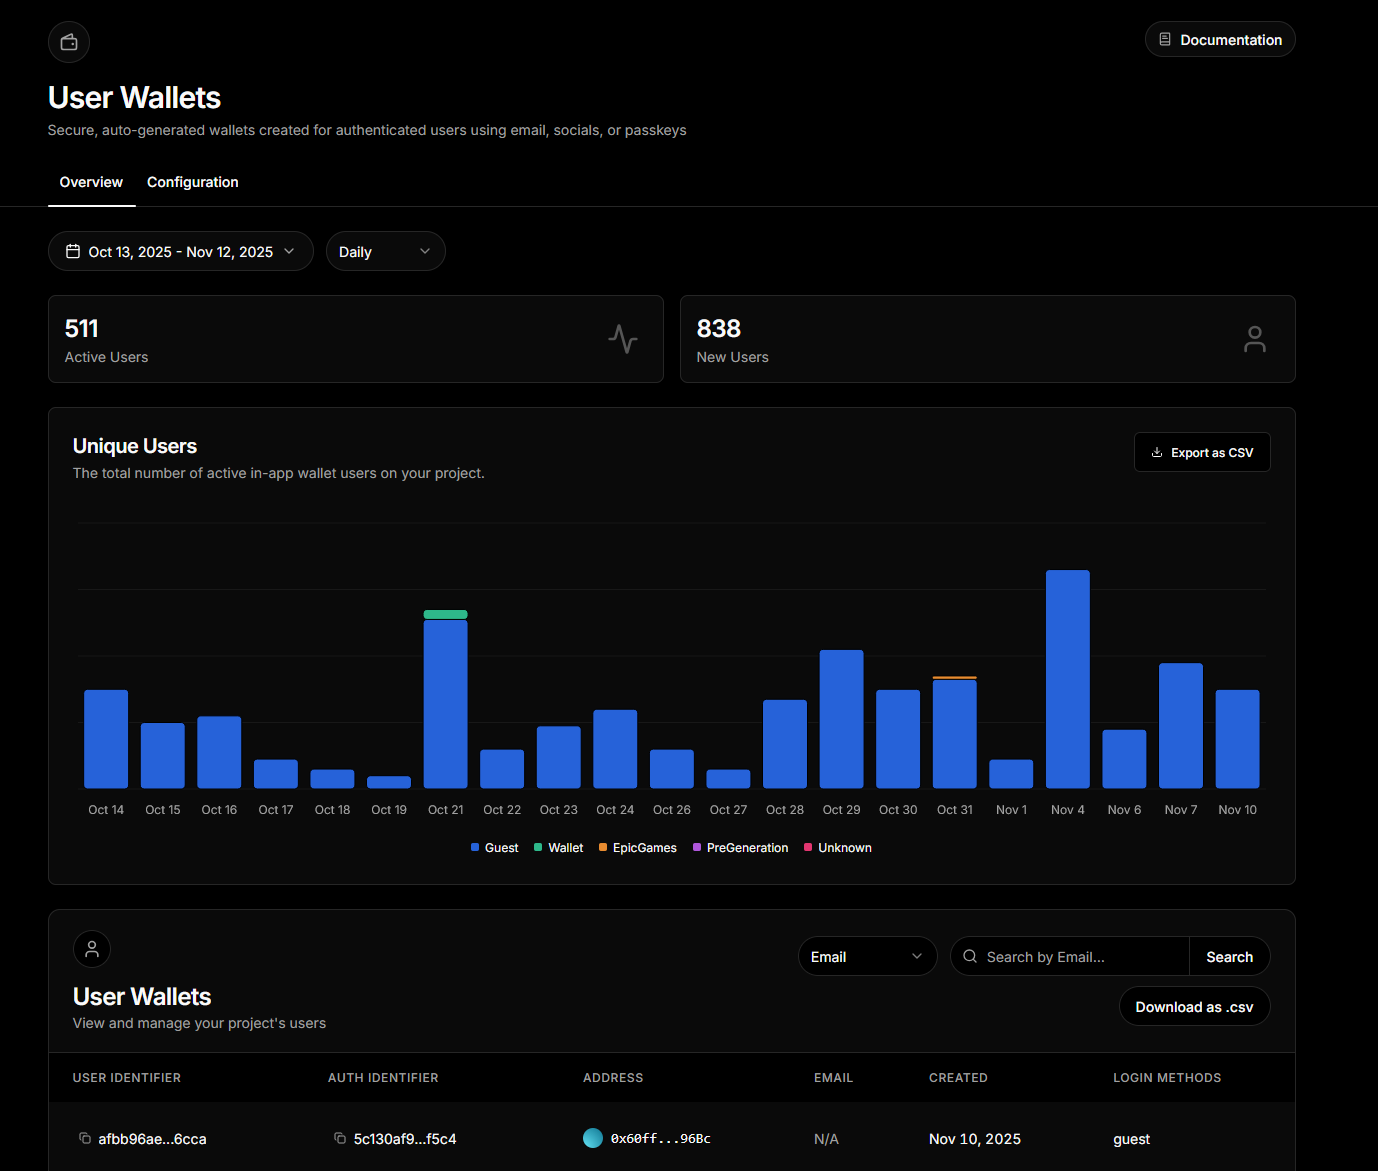
The configuration section contains your User Wallet configurable options such as custom authentication and branding for OTP emails.
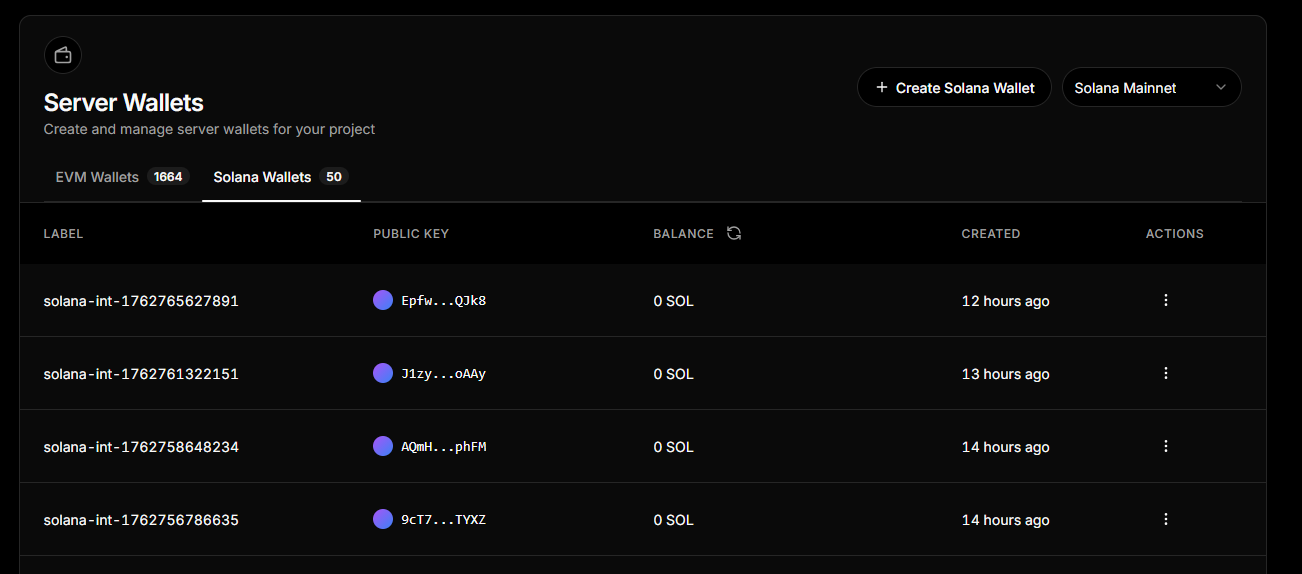
Similarly to User Wallets, you can view analytics about transactions made from your backend as well as the EVM and Solana server wallets you have configured. This was previously all of the UI from the Transactions tab.
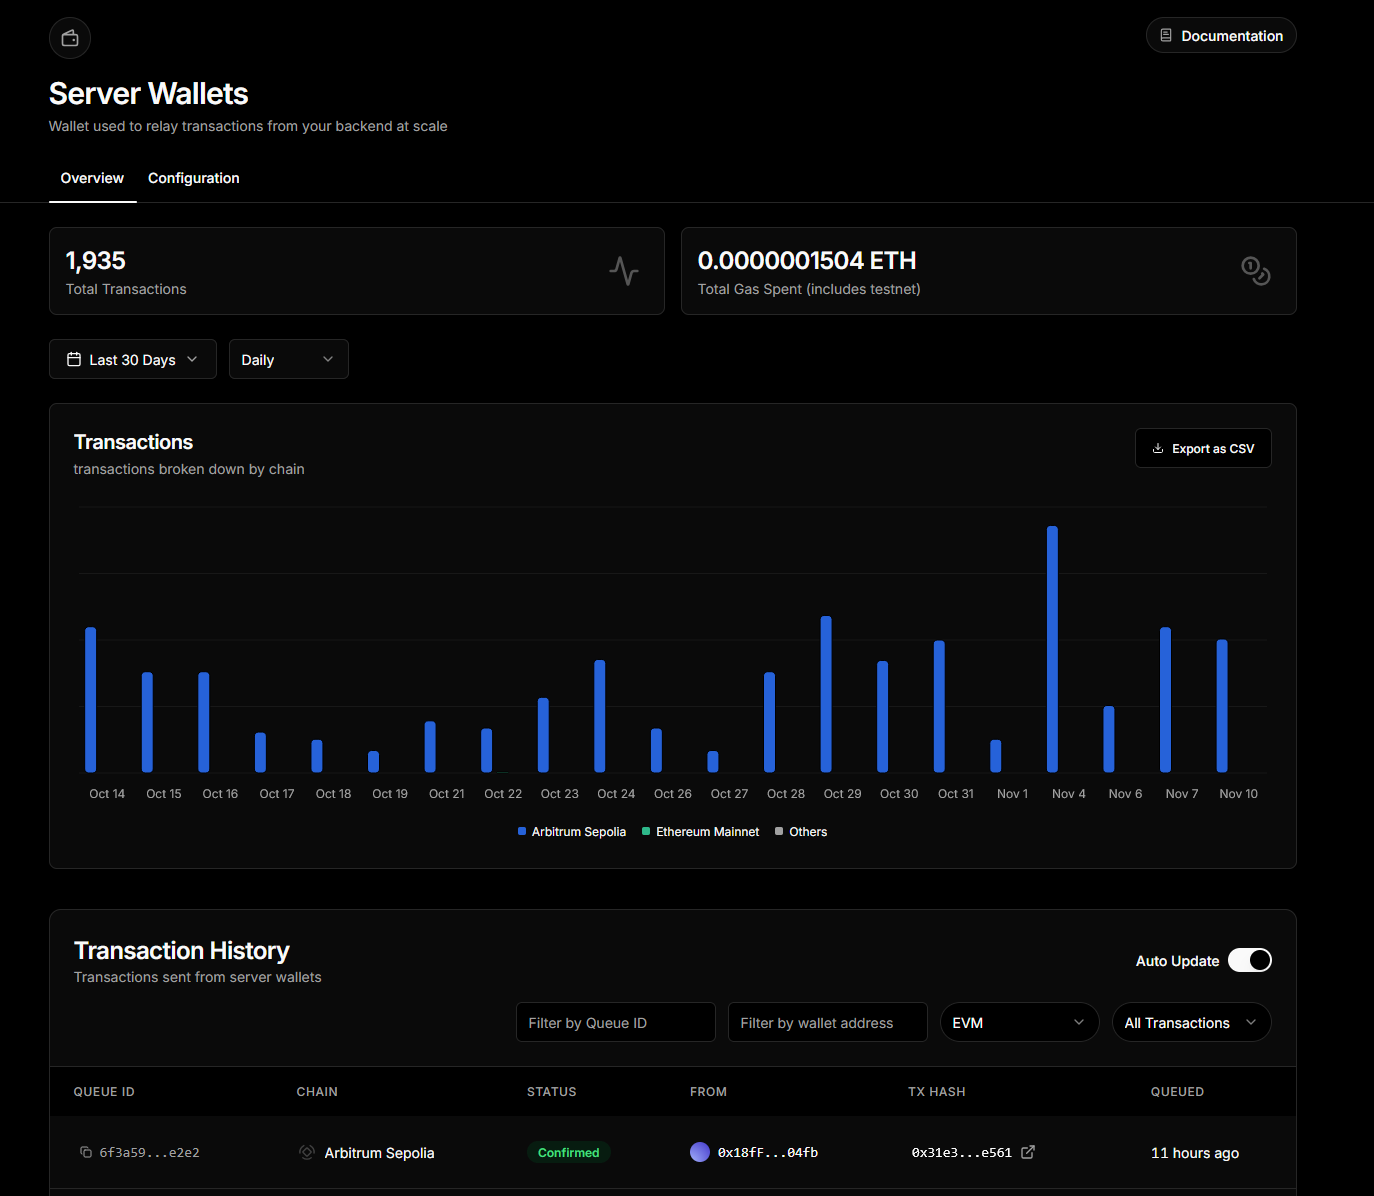
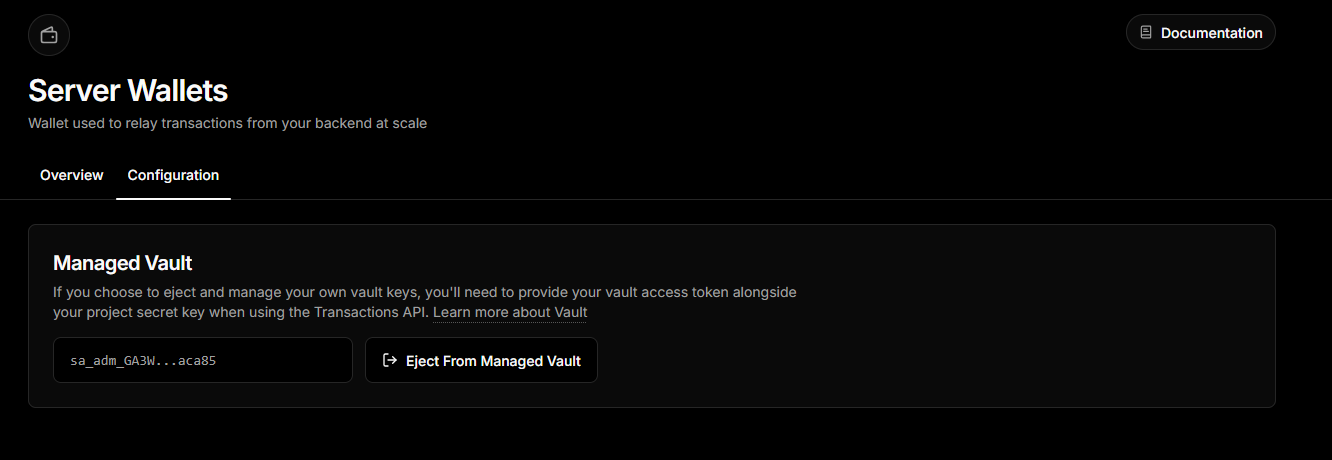
The Vault section has moved here, it is what powers Server Wallets and you can manage it there. By default, no action is needed and it is managed automatically, but you can choose to eject from it and pass extra x-vault-access-token to our APIs and SDKs to interact with your server wallets if you do so.
This section shows you your gas sponsorship usage regardless of the interface (or EIP/execution mode) used to sponsor said gas. You can track your usage here easily.
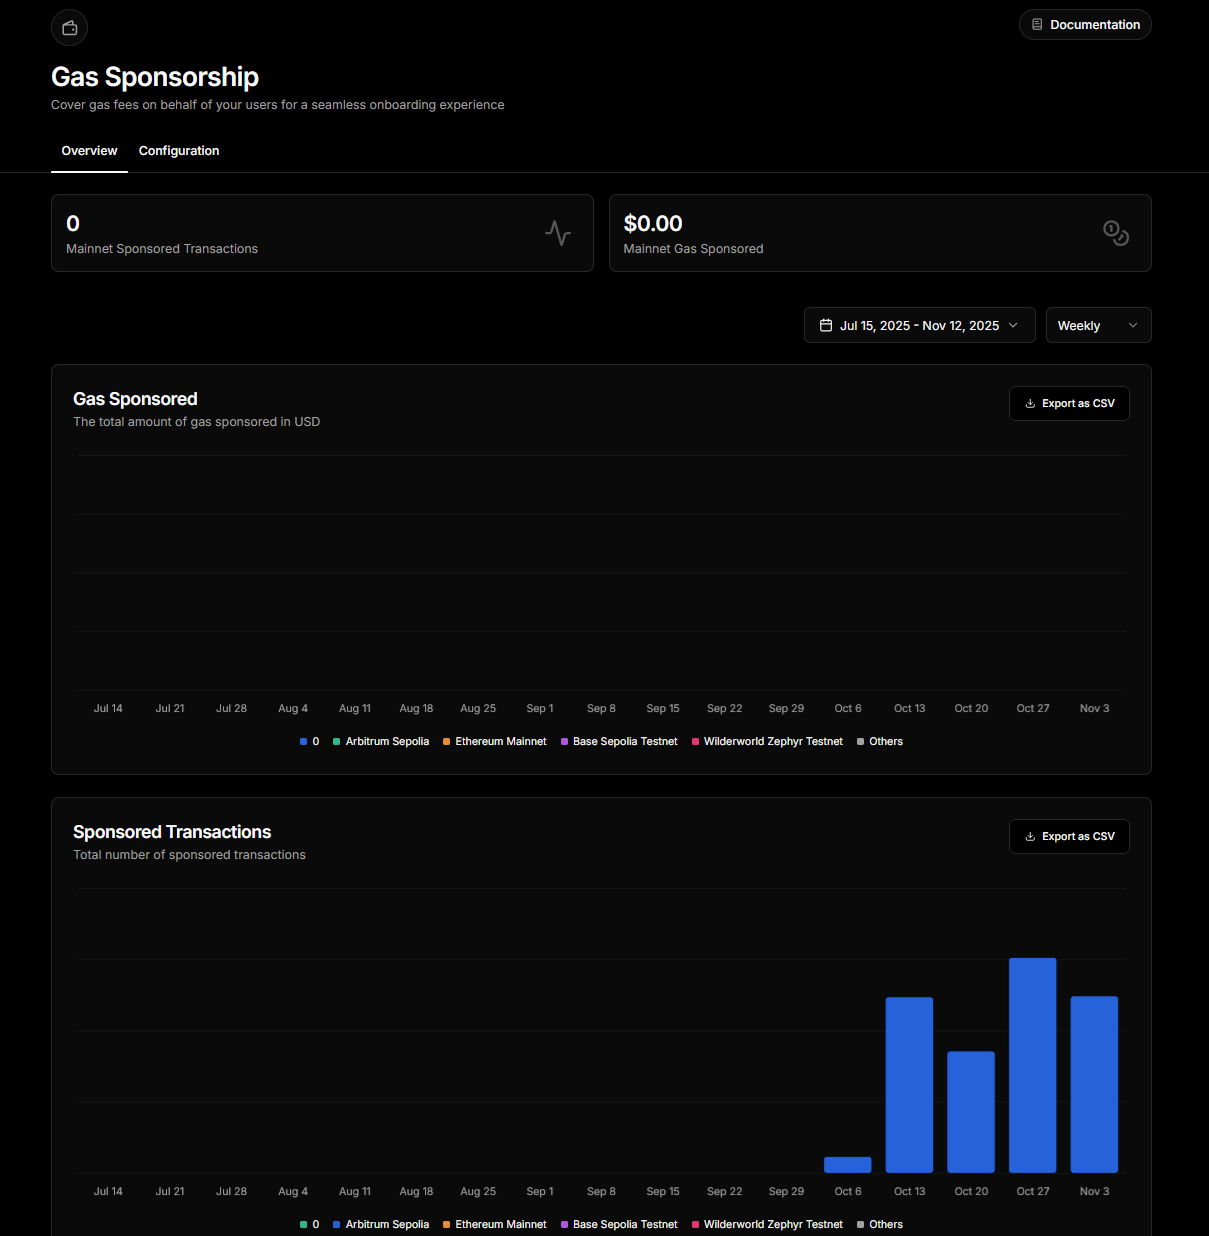
You can configure your sponsorship policies granularly here.

No functionally relevant pages have been removed, they're at most been moved to the new sections that hopefully feel more natural now.
Various bug fixes were integrated as part of this change, as well as link fixes.
You may still access some of these configurations from the project settings, which will redirect to the new pages as needed.
If you have any questions or need support, please reach out to our support team.
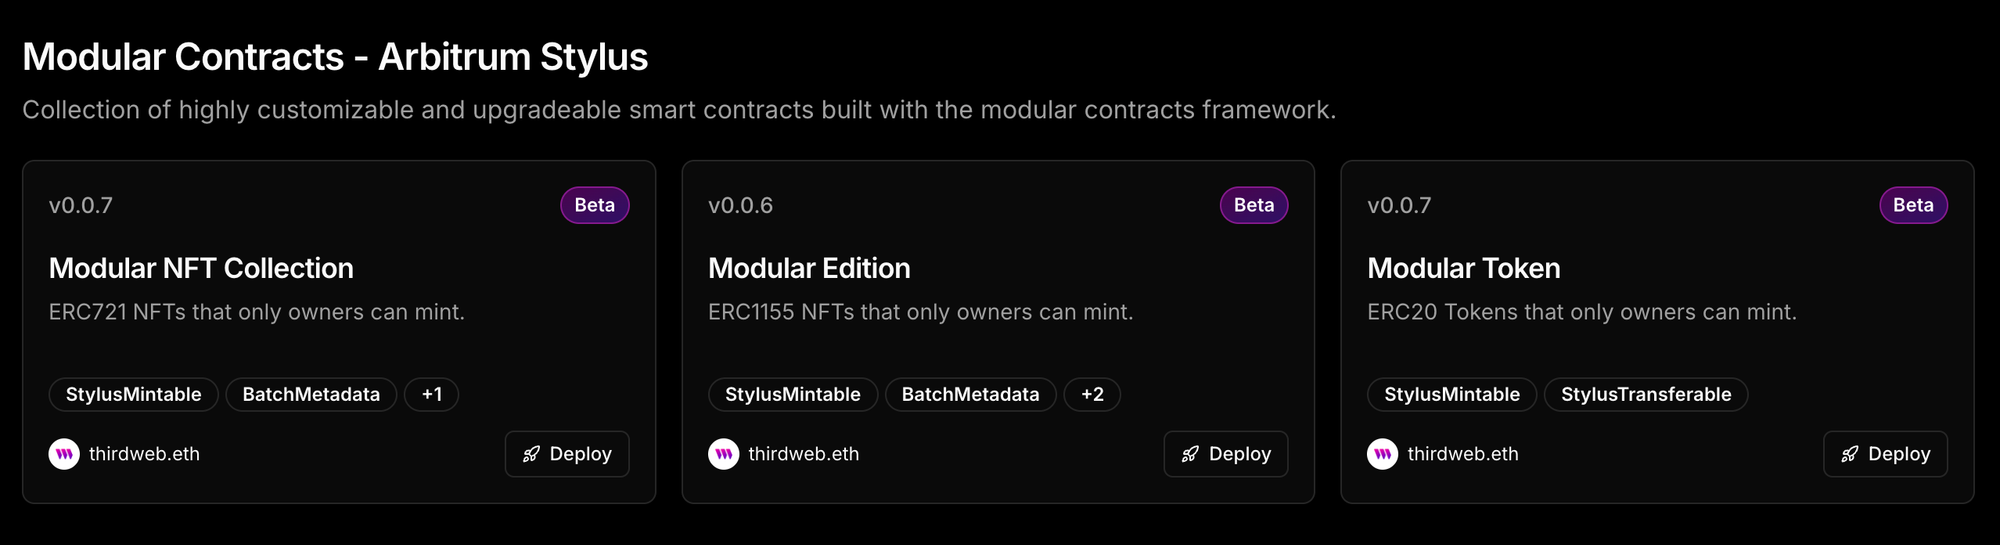
We have added support for creating and deploying modular contracts with Stylus. Users can now install rust based modules into the original solidity based modular contracts as described in the main design doc.
This plug-n-play model also allows users to write their own custom minting logic in rust, taking advantage of Stylus' interoperability and gas savings. These modules work with existing router contracts and modules written in solidity.
- Modules available on Explore
- These modules are designed to be used with the core contracts available here: ERC20, ERC721, ERC1155.
| Learn how to deploy and interact with Stylus contracts through thirdweb documentation.
Here's a quick overview of how to deploy and setup your modular contracts via thirdweb dashboard.
- Navigate to thirdweb explore page and select one of the core contracts to use. For e.g. Modular NFT Collection:
- Once you have deployed one of these contracts, the modules come pre-installed, both solidity and rust ones.
- If you wish to install / uninstall, navigate to modules tab on your contract page:
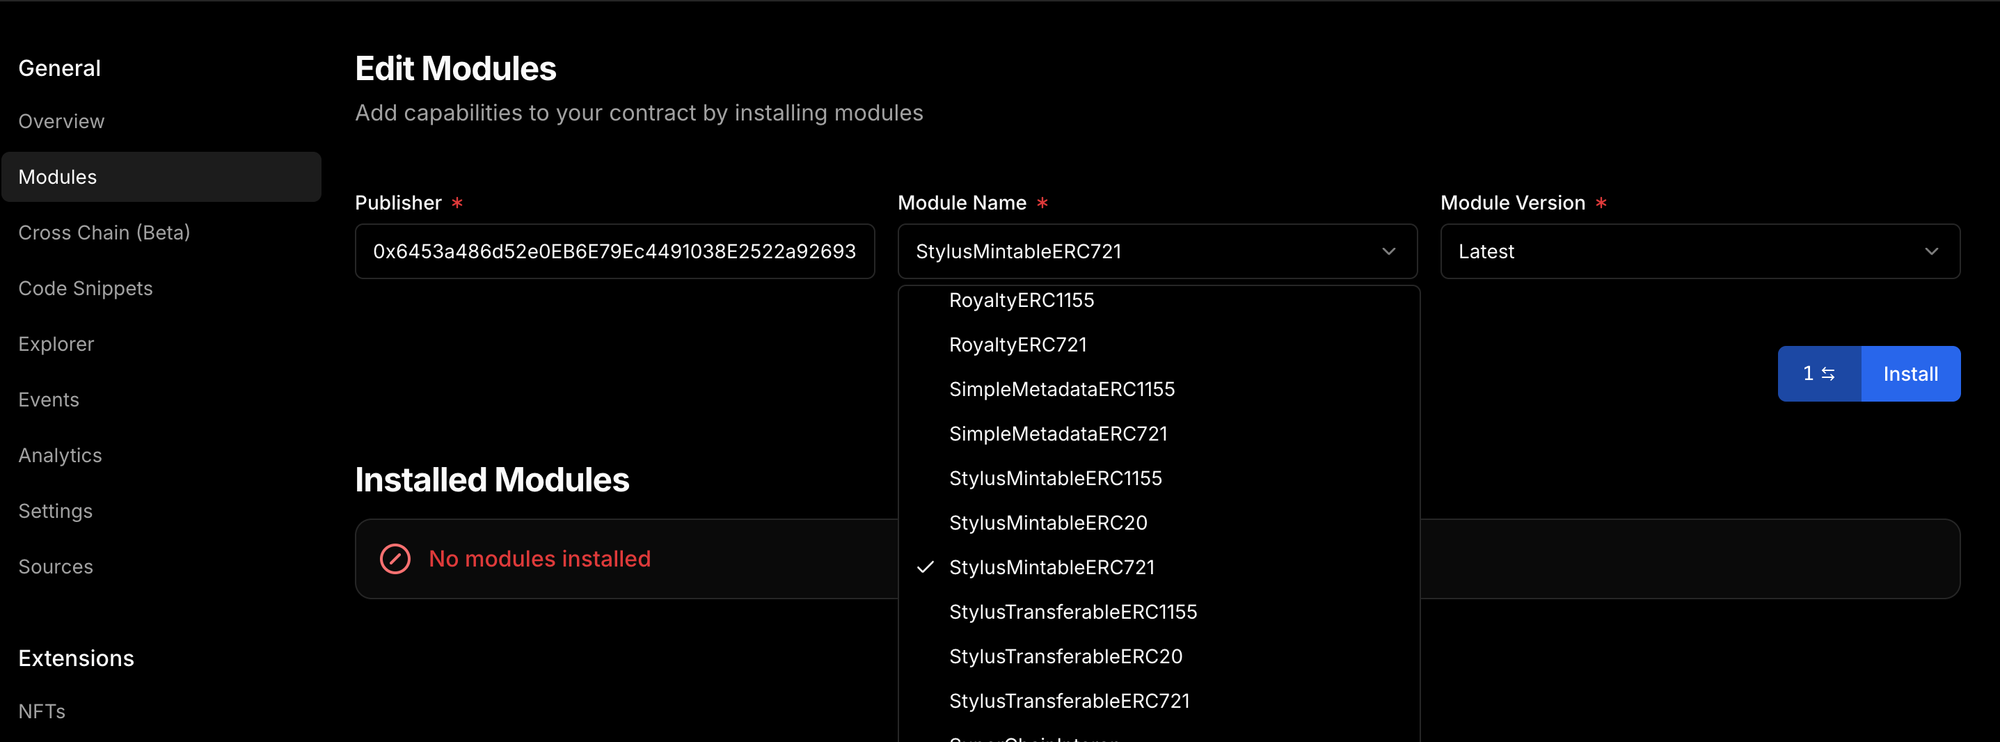
In addition, you can also write your own modules in rust and deploy / publish those using thirdweb CLI.
Need help? Please reach out to our support team
GET /v1/solana/swap - Get Swap Quote
Get a quote for swapping Solana tokens without executing the transaction. See the expected output amount, USD values, and slippage before committing.
Example: Get quote to swap 0.1 SOL for USDC
Response:
POST /v1/solana/swap - Execute Swap
Execute a complete token swap with automatic signing, execution, and on-chain confirmation. The swap is confirmed on Solana within 30 seconds or returns a timeout error.
Example: Swap 0.1 SOL for USDC
Response:
View transaction: https://solscan.io/tx/5ttCNobho7nk5F1Hh4pU4d9T2o1yAFn3p1w8z8jk2jKd9KWCKN6dzyuT5xP1ny4wz9f5xCLjAF6Y9s9EoTW4aE1X
✨ Aggregated Liquidity - Best prices across multiple DEXs and liquidity sources
💰 USD Value Display - See real-time USD values for input and output amounts
⚡ Automatic Execution - No need to manually sign or submit transactions
🔒 Confirmed Results - Returns only after transaction is confirmed on-chain
🌐 Mainnet Only - Swaps available on Solana mainnet (solana:mainnet)
💸 Gasless Support - Qualifying swaps ($10+ with <0.01 SOL) may be gasless
| Token | Mint Address |
|---|---|
| SOL | So11111111111111111111111111111111111111112 |
| USDC | EPjFWdd5AufqSSqeM2qN1xzybapC8G4wEGGkZwyTDt1v |
| USDT | Es9vMFrzaCERmJfrF4H2FYD4KCoNkY11McCe8BenwNYB |
| Parameter | Type | Required | Description |
|---|---|---|---|
address | string | Yes | Wallet address executing the swap |
tokenIn | string | Yes | Input token mint address (token being sold) |
tokenOut | string | Yes | Output token mint address (token being bought) |
amount | string | Yes | Amount in smallest unit (e.g., lamports for SOL) |
chainId | string | Yes | Must be solana:mainnet |
| Field | Type | Description |
|---|---|---|
signature | string | Transaction signature (POST only) |
inputMint | string | Input token mint address |
outputMint | string | Output token mint address |
inputAmount | string | Amount of input token swapped |
outputAmount | string | Amount of output token received |
inputUsdValue | number | USD value of input amount |
outputUsdValue | number | USD value of output amount |
slippageBps | number | Slippage tolerance in basis points |
requestId | string | Unique request identifier |
Amounts must be in the token's smallest unit (before decimals):
- SOL (9 decimals): 1 SOL =
1000000000lamports ="1000000000" - USDC (6 decimals): 1 USDC =
1000000="1000000" - 0.1 SOL:
"100000000"(100 million lamports) - 10 USDC:
"10000000"(10 million)
The API returns detailed error messages for common issues:
Insufficient Balance:
Minimum Swap Amount ($10+ for gasless):
Transaction Timeout:
Ready to start swapping? Check out the full API documentation for more details.
- On the Playground https://playground.thirdweb.com/wallets/sign-in/button
- Using the thirdweb API, fill in and run https://api.thirdweb.com/v1/auth/social?provider=epic&redirectUrl=&clientId= right in your browser!
🔐 Sign Transaction (POST /v1/solana/sign-transaction)
Sign a Solana transaction without broadcasting it. Perfect for workflows where you need to inspect, store, or conditionally broadcast transactions.
Features:
- Sign serialized transactions or assemble from instructions
- Configure priority fees and compute limits
- Returns both signature and signed transaction payload
Example - Sign from instructions:
Response:
📡 Broadcast Transaction (POST /v1/solana/broadcast-transaction)
Broadcast a previously signed transaction and wait for confirmation. The endpoint polls the network until the transaction is confirmed or times out after 30 seconds.
Features:
- Broadcasts signed transactions to Solana
- Waits for confirmation before returning
- Detailed error messages for failed transactions
- Returns signature (Solana's equivalent of transaction hash)
Example:
Success Response:
Error Response (Transaction Failed):
Sign a transaction, then broadcast it:
The broadcast endpoint provides detailed error information:
- 400: Transaction failed (simulation or on-chain) - includes error details, instruction index, and signature
- 504: Transaction timeout - not confirmed within 30 seconds
- 500: Server error during broadcast
All errors include the transaction signature when available, allowing you to look up the transaction on Solana explorers for debugging.
- Signature = Transaction Hash: In Solana, the "signature" is equivalent to an EVM transaction hash - use it to look up transactions on explorers
- Confirmation: The broadcast endpoint waits for "confirmed" status before returning (typically 1-2 seconds on Solana)
- Timeout: 30-second maximum wait time for confirmation
- Preflight Checks: Failed transactions are caught during simulation before being sent to the network when possible